The Dog Lady's Coffee Pallet Rack
The Dog Lady's Coffee Pallet Rack
How NOT to DIY (but laugh at me while I do it anyway)
I realized it has been a while since I have done one of my DIY posts...not that they really should help anyone. Really no one should do DIY like I do DIY, fair warning. |
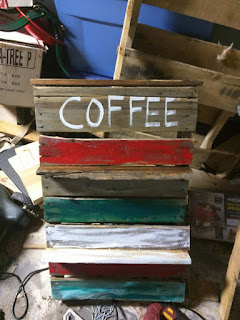
| Here is the finished project. Do not let its prettiness fool you into doing the project like I did. |
So, I was driving down my street and noticed my neighbor was throwing away some relatively (only a few spiders hanging out in there) pallets. So naturally I scooped them up. Being an avid Pinterest junky (pretty please pin my articles), I, of course, wanted to jump on the pallet project bandwagon. Apparently, when you work with wood pallets, you are supposed to look for specific stickers and only get them from certain places because they can be really toxic. Did I heed this advice? Nooooope. If I keel over and die, that might be the source. Just saying.
Anyway, here I am with my possibly poisonous wood, thinking, how do I go about making a coffee rack? I know! Power tools! Power tools are the best ever for single dog ladies. Power tools= single dog lady empowerment. Seriously.
I did not have a specific plan in mind. I just kind of eye-balled it. I used my circle saw and my jig saw to kinda hack cuts where I thought they should be. I did not really measure. I just kind of cut until I thought it was the right size and then brought it inside and smacked it up against the wall to see if it was. Eventually it was a goodish size.
I went to Lowe's and got some simple rubbed oil bronze hooks in the hardware section for like a dollar or two a piece. I love Lowe's because they allow well behaved pets to come with you into the store. Home Depot has the same policy. Yay pet friendly stores!
I had some pleasantly convenient gaps in my pallet lats where I wanted to stick some small shelves. Did I plan is that way? No, but happily it just appeared that way. Yay! So, I rooted around in my stock of excess pallet wood and found some pleasingly rustic looking pieces that I could use for shelves. They were full of nasty rot and ants. I threw them out and found some other pleasingly rustic looking pieces senza the rot and ants. I cut those to size with my circle saw and then used my new nail gun to secure them to the pallet rack. I just kind of shot the nails in there at different angles until it looked secure. Should I own a nail gun? Probably not, but I was a good girl this year, so Santa brought me one anyway. (You'll shoot your eye out! A Christmas Story anyone?).
 |
| In the works |
Then I went over the whole thing with my belt sander. I used some acrylic paint to put a bit of color into the project and wrote COFFEE at the top. I did not use a stencil or plan out the letter spacing (surprise surprise). I just winged it. It turned out alright. Then, once the paint was dry I sealed the whole project with a lacquer finish. Then I affixed the hooks where they looked like they should go. I drilled pilot holes first when doing this because I did not want the pallet wood to split.
Then I realized that I had no way of actually hanging the darn thing on the wall. After piecing at it a bit, I decided to cut catches in the topmost back pallet board so that screws could slide up the pocket and stay secure. Pretty much everything in my house is hung by cement anchored screws because even my inner walls in my house are made of concrete (thank you 1950s paranoia. I am pretty sure my house will still be standing after the apocalypse if there is such a thing). So I used my jig saw to hack some uneven divots in the back board and hung it up. So far it has not come crashing off the wall (sometimes my projects do so I adopted a practice of tester objects. The first few days any of my projects are hanging, I put tester objects that are either unbreakable or I do not care about that much on it, in case it falls off the wall. These are necessary practices if you DIY like I DIY and really you should not).
After a sufficient test period, I got out all my cute doggy-themed mugs and some decorative dish towels, and went to town. It is still hanging up there. The puppies have not managed to pull it off the wall by hanging like piranhas off the dish towels. Oh, and I have not died via toxic poison evil pallet wood yet.
If I do die, I will let you know.
Cheers,
Sammy the Dog Trainer
aka the most hopeless DIYer out there


@BlogDocker
ReplyDelete